Import a job sheet
|
Before you start This option imports data from a spreadsheet and places it in the job queue
|
Why would I import an Excel spreadsheet of job data?
|
|
Overview of process |
|
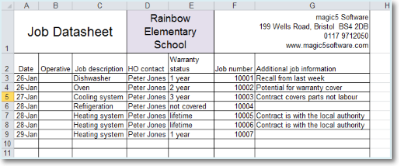
Step 1. Open the original Excel spreadsheet
- Open your Excel spreadsheet which might look something like this:
- If you do not currently have a spreadsheet please read through this guide before creating one so that you can optimise the design.
Step 2. Create a job definition into which the job data will be imported
- Create a suitably named job definition (ie better than mine!) with an appropriate associated template (get help).
-
Add items (get help) that correlate with the data columns that will be imported from your spreadsheet. For example, the job definition below will receive data from the spreadsheet shown in step 1. Job data such as date, customer and location are automatically included in the job definition.

- Further items and actions not related to the spreadsheet can be added as required.
- Make a note of the unique names relating to the import data (or leave this screen open for reference).
Step 3. Create a list called 'Spreadsheet formats (Jobs)'
- Create a list (get help) with the title Spreadsheet formats (Jobs). The exact name is important.
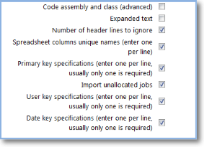
- In the 'Additional Attributes for list entries' tab, tick the boxes illustrated below.
- Save.
Step 4. Create entries in the list
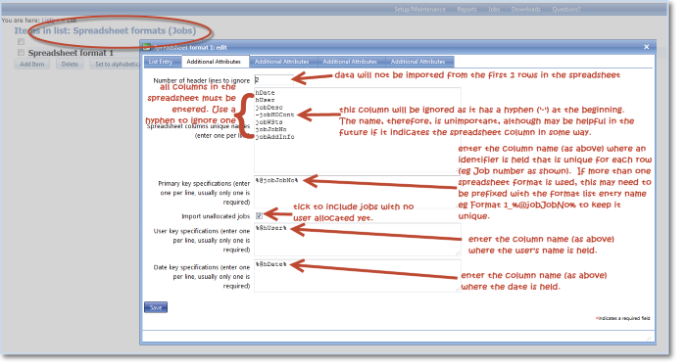
- Add a list entry (get help) for each spreadsheet format you will be using (making the title more meaningful than mine!).
- Open the Additional Attributes tab.
- In Number of header lines to ignore, enter the number of rows on the spreadsheet that do not have data that you wish to import (eg logo, company address, headings).
- In Spreadsheet columns unique names enter the corresponding unique names from the job definition.
If there are columns in the spreadsheet that you do not wish to appear in the job details, prefix them with a hyphen ('-') and enter any name (it is recommended to use something meaningful for future reference). These must be included as 'placeholders' so that subsequent data items appear in the correct place. - In Primary key specifications enter the name (as in step 4) of the column that holds a unique identifier for each row (such as Job Number). If more than one list entry is being created (ie there is more than one import format) it is recommended that this is prefixed with some text (eg the name of the format) to maintain uniqueness between imports (for example, using my not-very-meaningful-name, 'Format 1_%@jobJobNo%' (without quotes)).
- Tick the Import unallocated jobs box avoid losing any jobs while getting underway. It can be changed at a later date.
- In User key specifications enter the name of the column in the spreadsheet where the user (or operative) is stored.
- In Date key specifications enter the name of the column in the spreadsheet where the date is stored.
- Save.
Step 5. Import the job data from the spreadsheet


- Open the jobs list (unallocated or outstanding) and click the Import jobs from spreadsheet button.
- Click the Add attachment link to select the required spreadsheet from your local folders.
- Select the required Spreadsheet format from the drop-down list. This will be the one(s) created in step 4.
- Select the associated Job type (as created in step 2).
- Select the associated Template. This should be the same as the Associated template selected in the Job definition.
- Select the Customer and Location for whom you are importing job data (the location will be populated once the customer has been selected).
- Save to start the import.
- When the screen has refreshed (indicated by your browser 'wait' icon) you should see the new items in your job list. It is recommended that you check these until you are confident that the import is set up correctly as incorrect set up may appear to work but omit rows (for example, if the number of rows to ignore is incorrect).
See Also